The starting point of all of your webinar funnels should be your email list (even if it’s small). Email is the #1 tactic for generating webinar registrations. If you don’t have an email list, read up on how to build one.
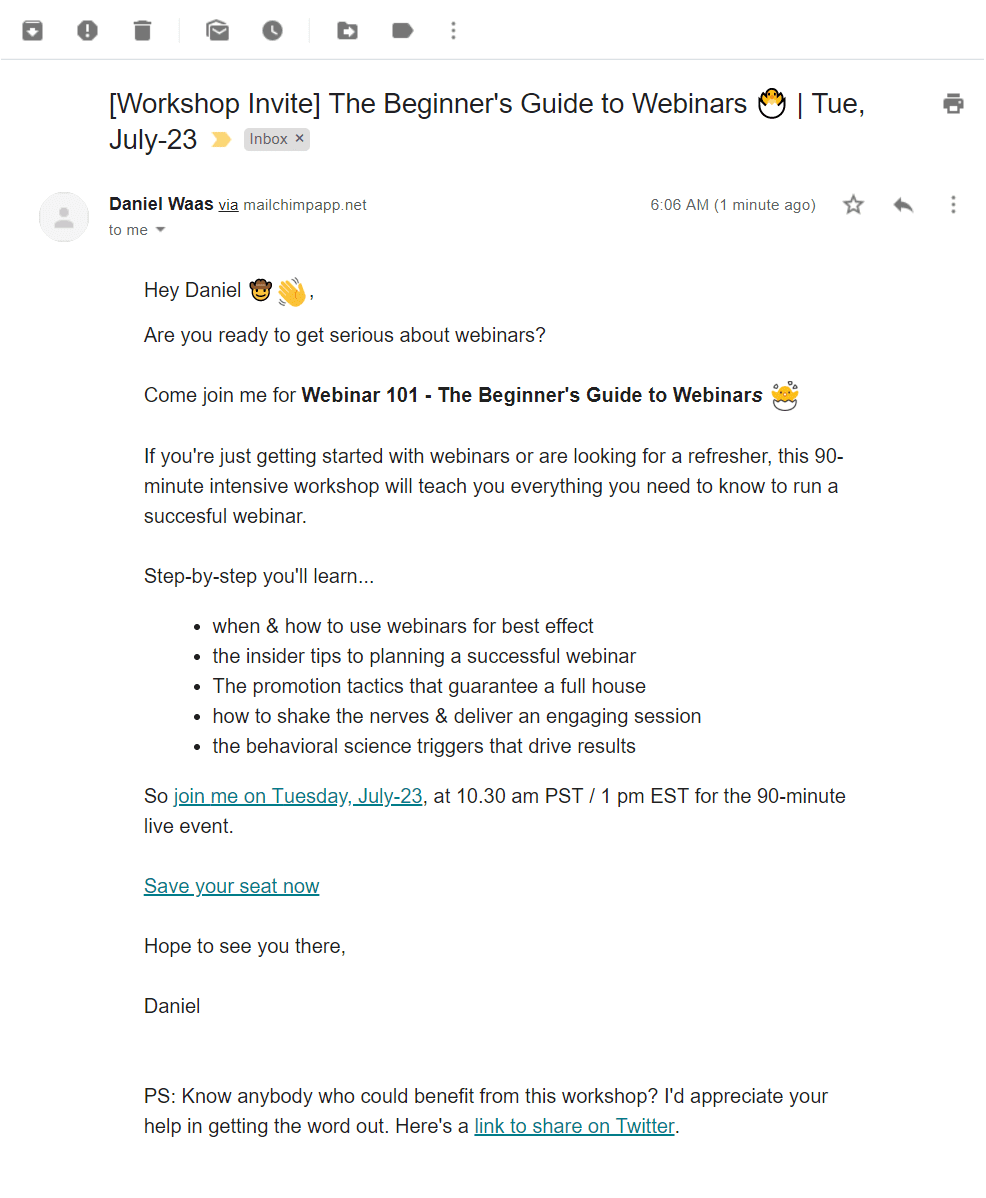
Invite your list with a simple text email. Below is an example I’ve created in MailChimp based on their single column text template.
Here’s a look at Mailchimp’s editor view for the same email:

I have a separate post covering how to write great webinar emails and you’ll find a starter guide to creating emails in MailChimp here.
Notice the email above has only three links.
The first two point to the webinar registration page. These are the important ones. The link in the PS helps boost registrations.
Creating landing pages with Elementor is a topic of its own. Instead of covering it here, I’ll direct you to Matthew Averkamp’s launchparty.org which has an excellent tutorial to get you started.
I’ve built the example below, the landing page for my Webinar 101 workshop, in Elementor and it took me less than an hour.
If you’re looking for inspiration read my teardown of some of the best landing page examples.
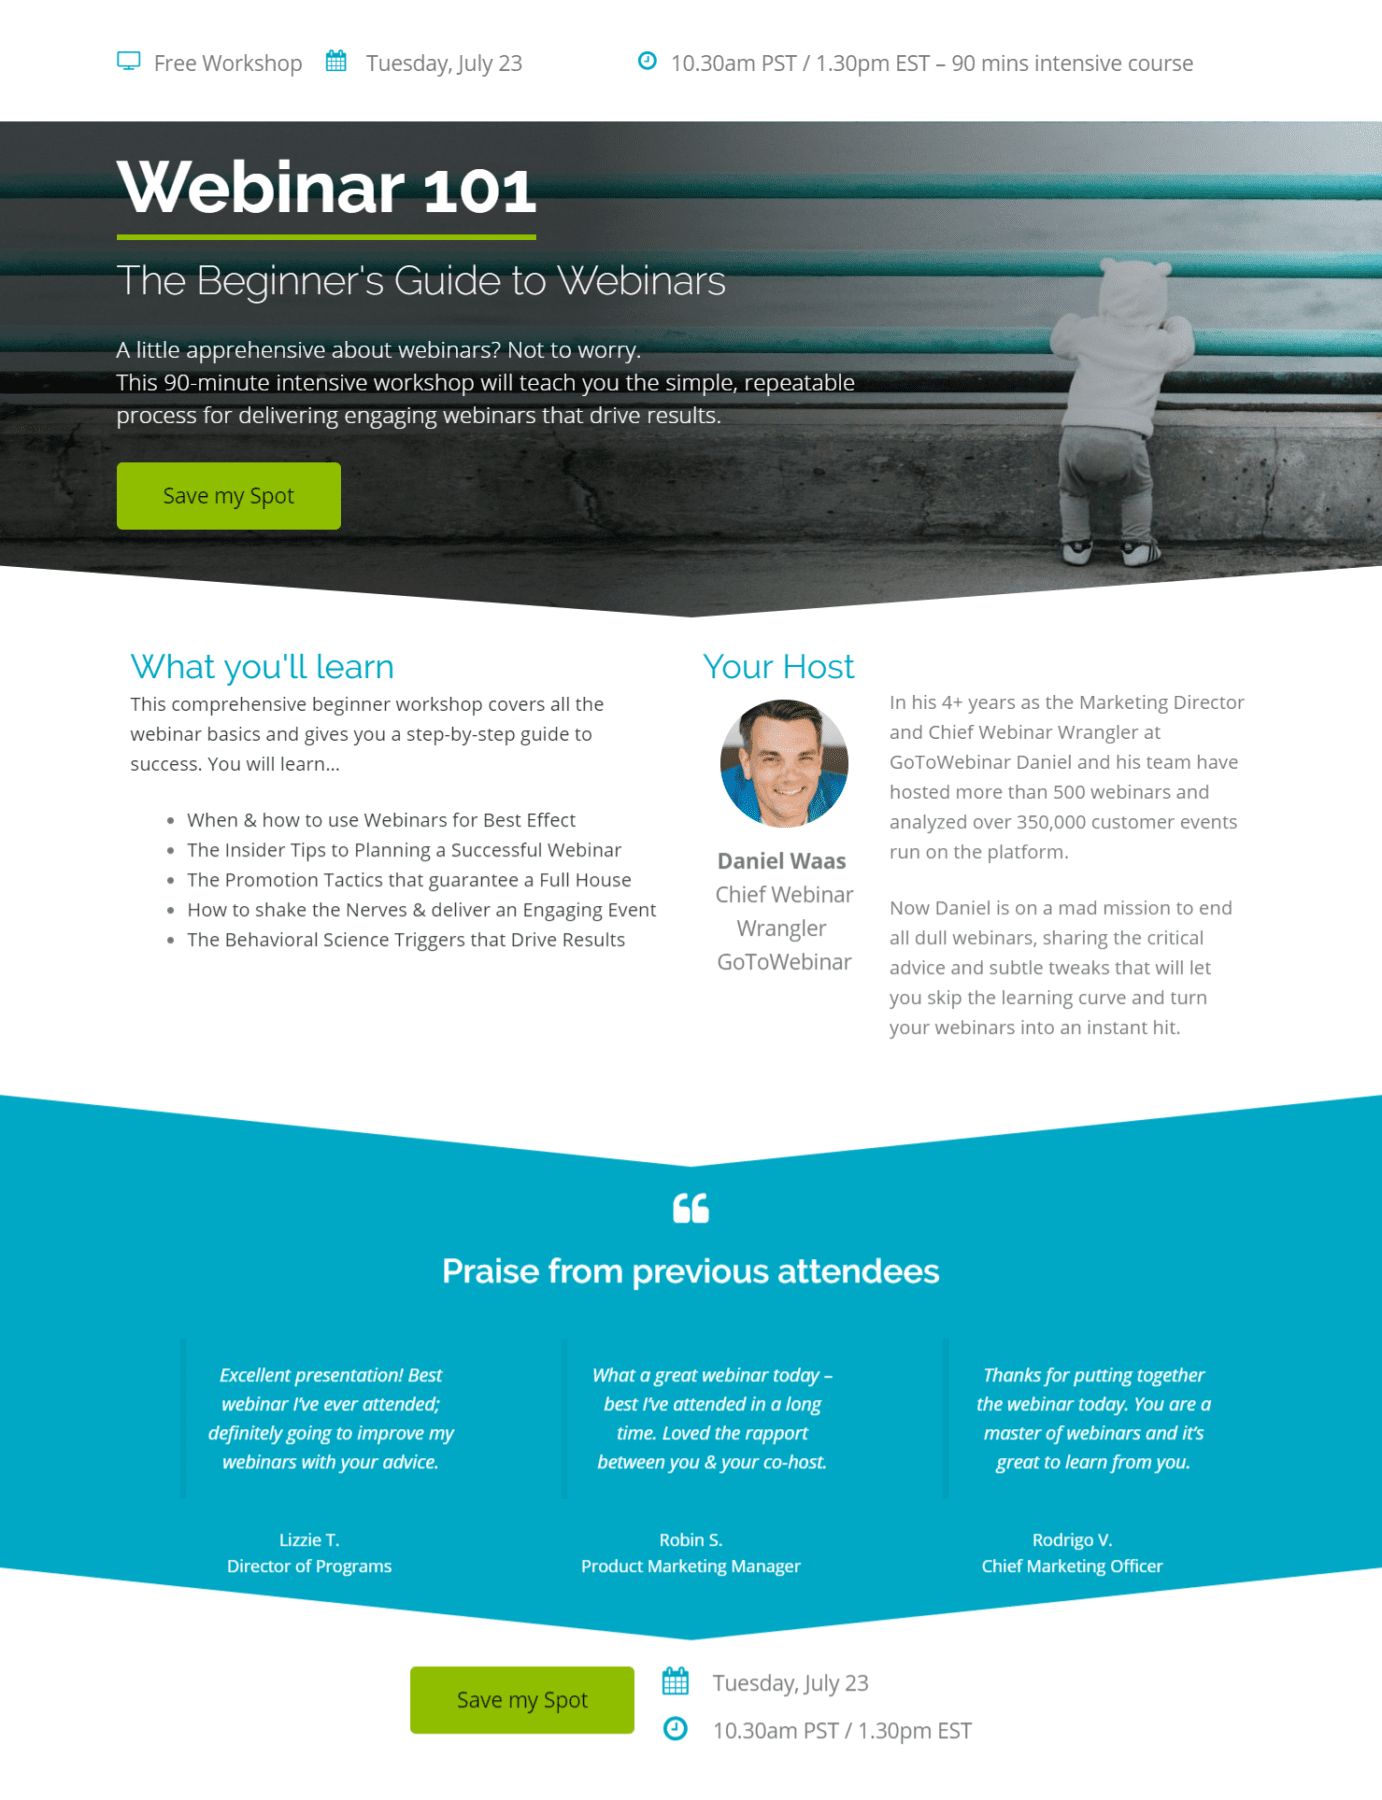
I’ve incorporated a few best practices into this template:
- A bold title
- A short description
- A bullet list of “What you’ll learn”
- Background on the speaker
- Social proof
- Two obvious calls-to-action
- A mercifully short sign-up form in a modal window
The form has one custom question: “What’s your webinar use case?”. That information is crucial for me and it would be impossible to append from 3rd party sources.
The form also has an optional opt-in for registrants to also sign up for my newsletter.
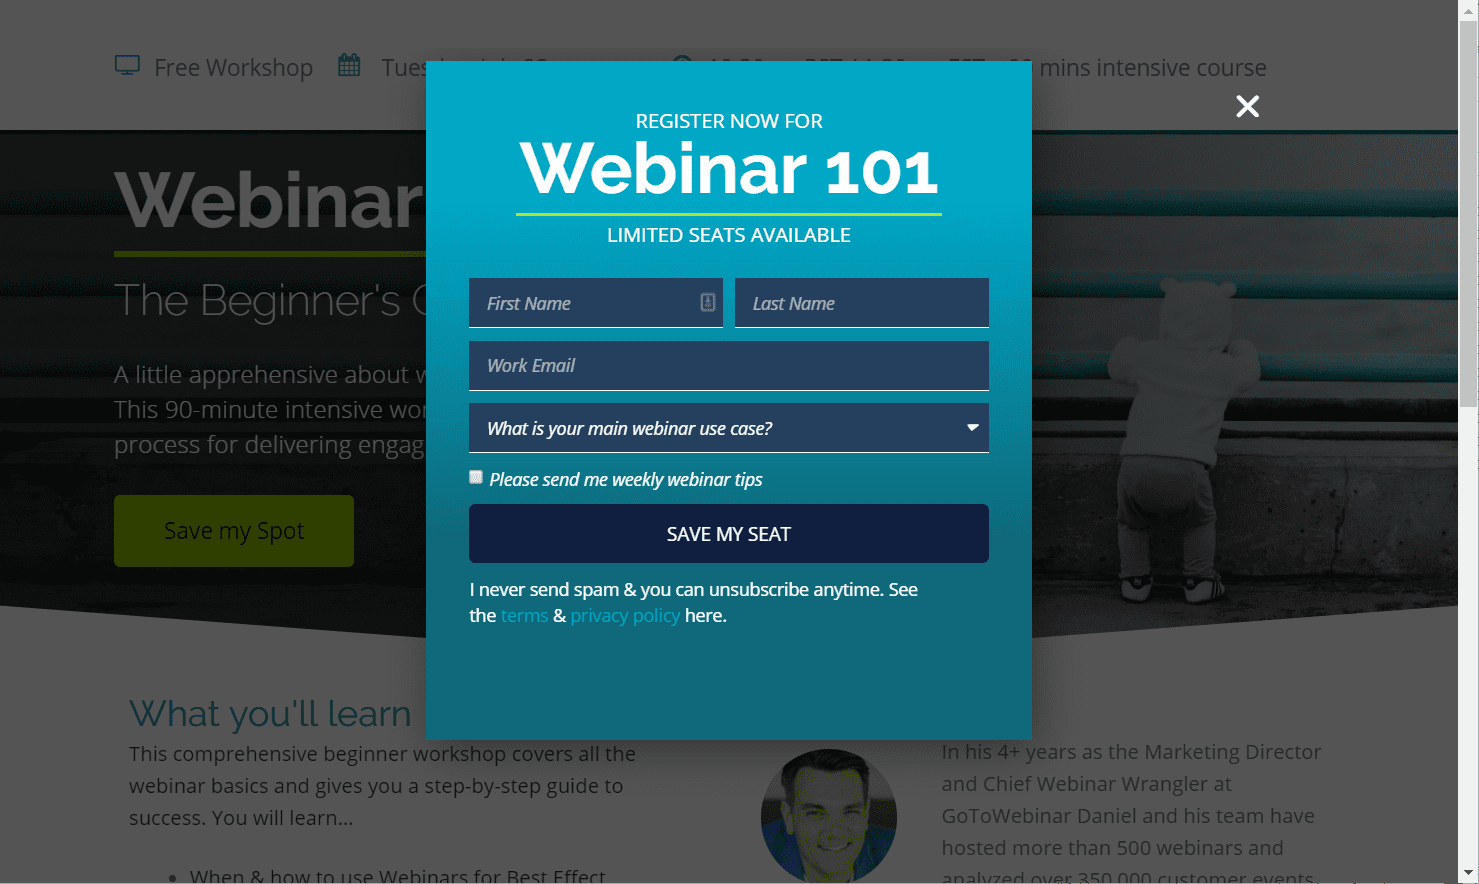
The form shown here I’ve built with Elementor. Unfortunately, forms and pop-ups are only available in the paid version.
I think it’s a good investment but alternatively, you can achieve a similar result using a free WordPress form plugin and embedding the form directly on the page.
Here’s a look at the Elementor backend in WordPress.
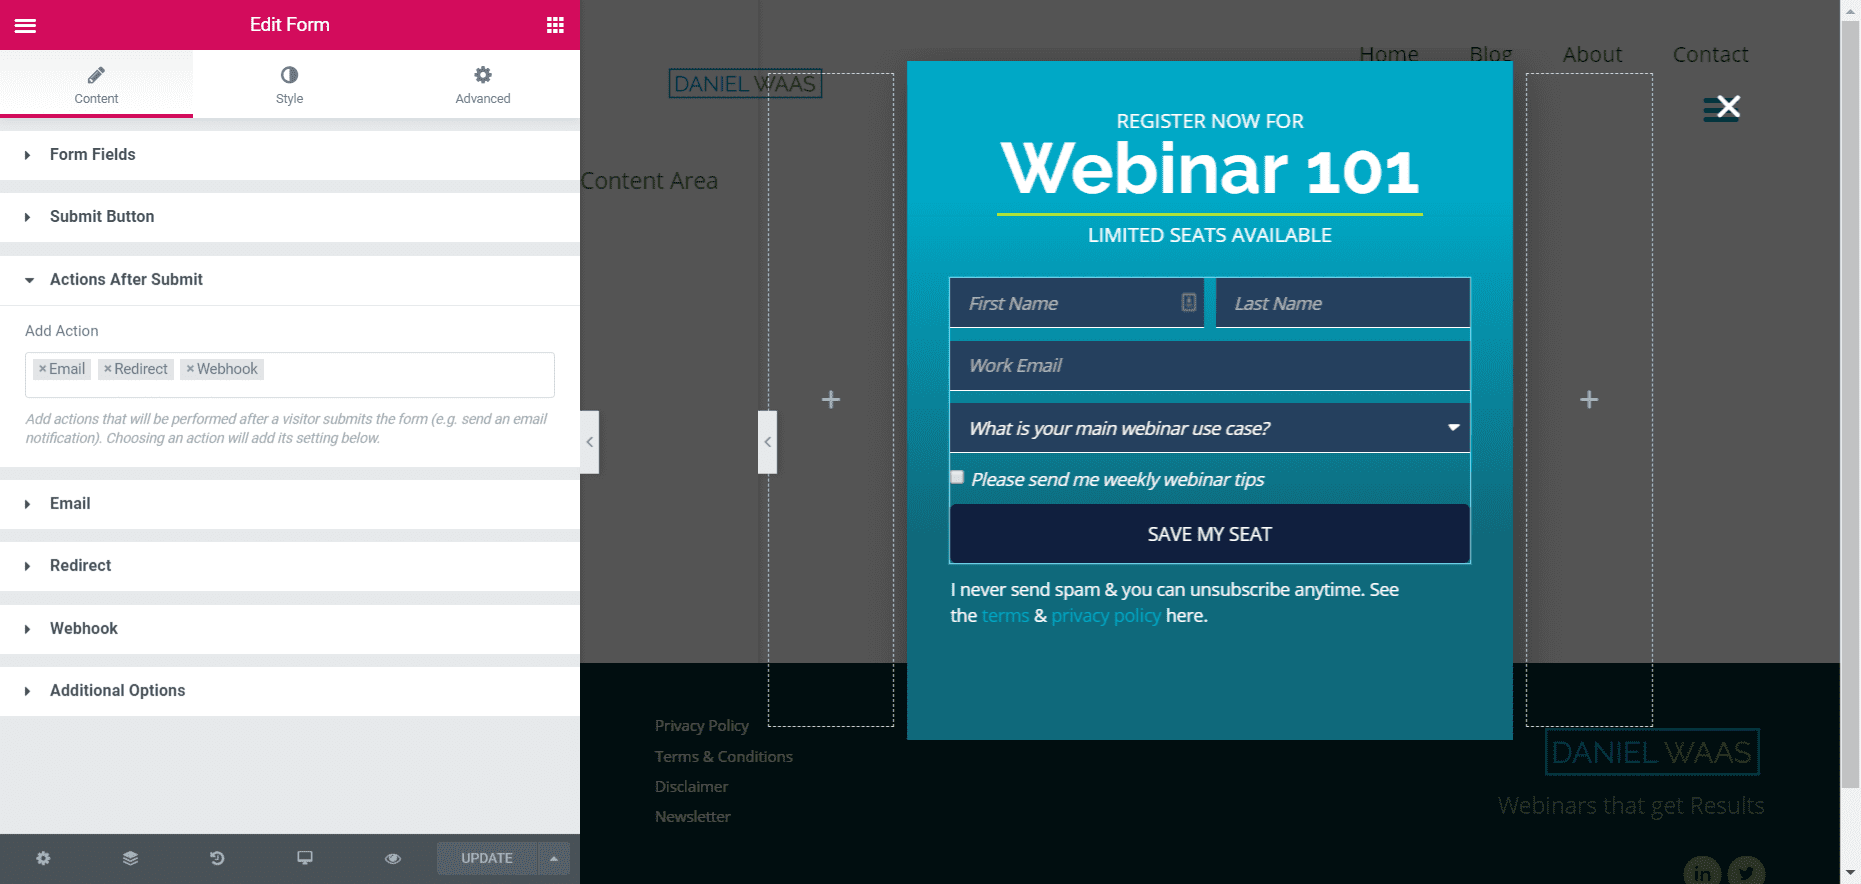
I’ve set three actions to occur whenever someone completes the form:
- I get an email notification
Pretty straightforward. I want to get notified whenever someone signs up. You’ll want to have this turned off if you have lots of registrants 🙂 - The user is redirected to a “Thank you” page
Once someone signs up you’ll want to immediately confirm the success of their registration. The fastest way to do that is a “Thank you” page. This is also a great place to let them know what the next steps are as well as prompt your audience to add the event to their calendar.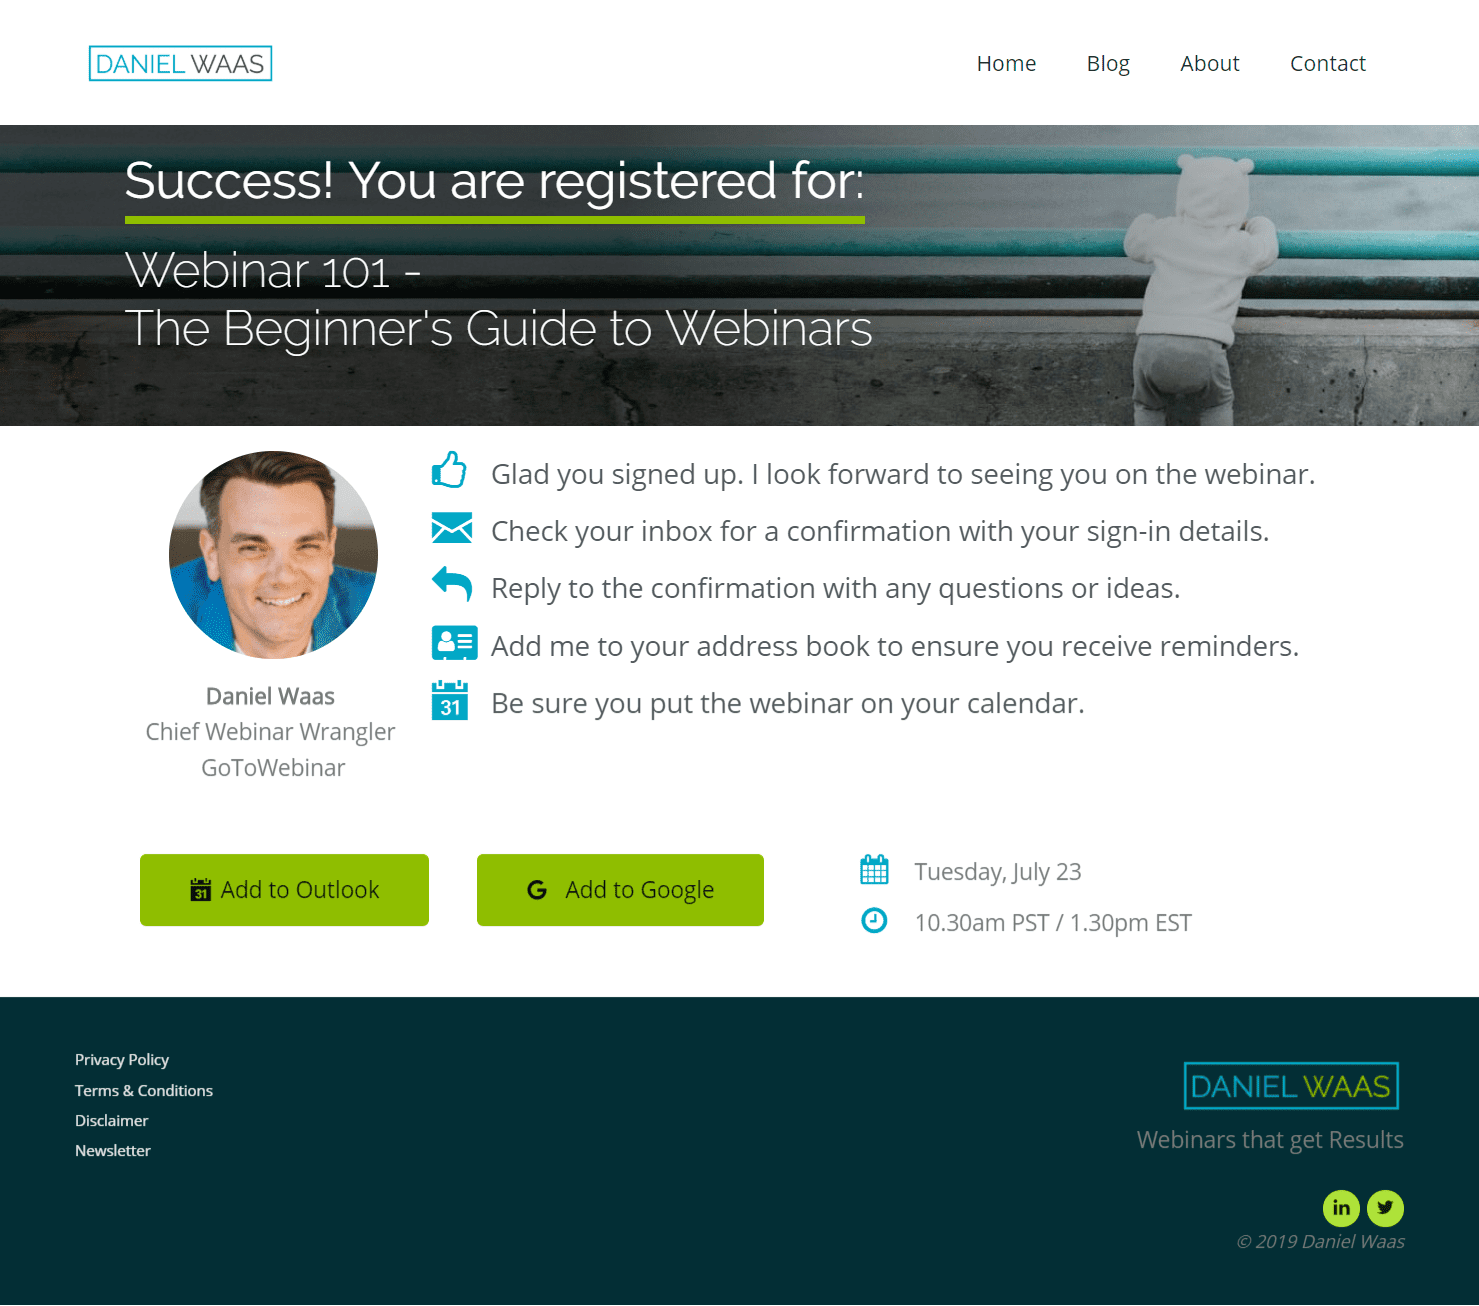
- Elementor calls a webhook
This is where the fun starts. Read on 🙂
A few things need to happen if we want the registrant to actually show up on the day of the webinar:
- We need to push the registration data to our webinar tool. In this case, GoToWebinar
- We need to send the registrant a confirmation email with instructions on how to participate
- (Optional) We need to add the registrant to our newsletter audience if they opted in
Zapier is our go-between to accomplish all of that. Zapier is a service that let’s you connect and integrate all sorts of apps and trigger actions based on logical conditions. Sounds a lot harder than it is. Let’s best take a look:
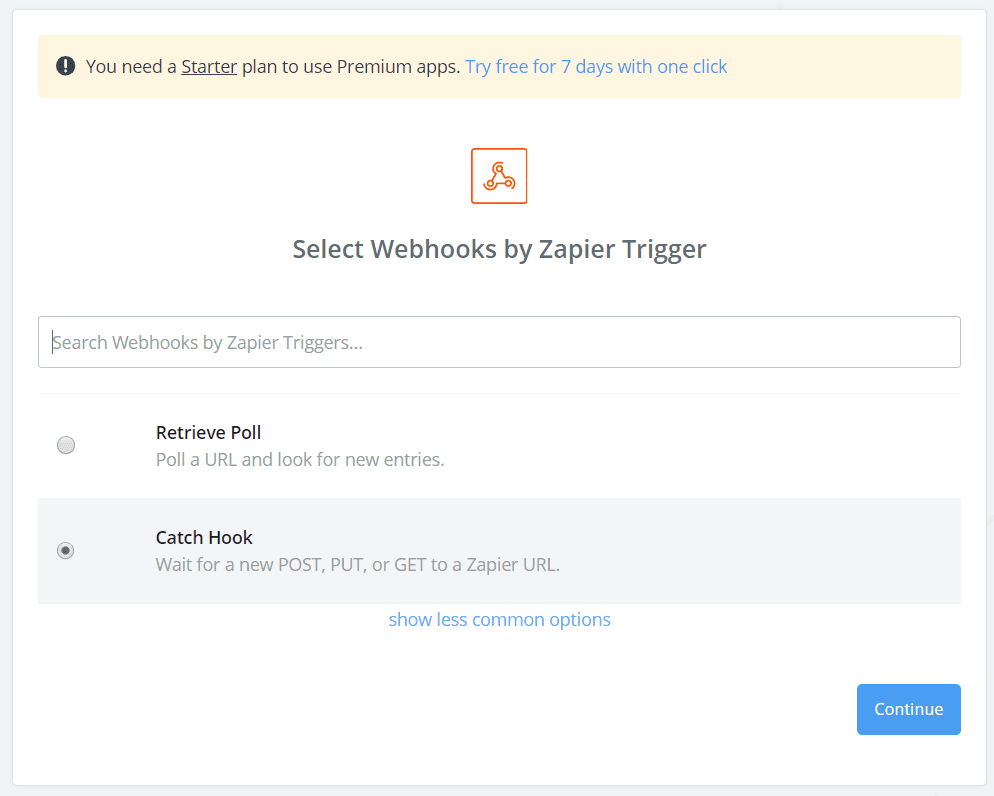
As the trigger step in Zapier we select the “Webhook” and select “Catch hook”.
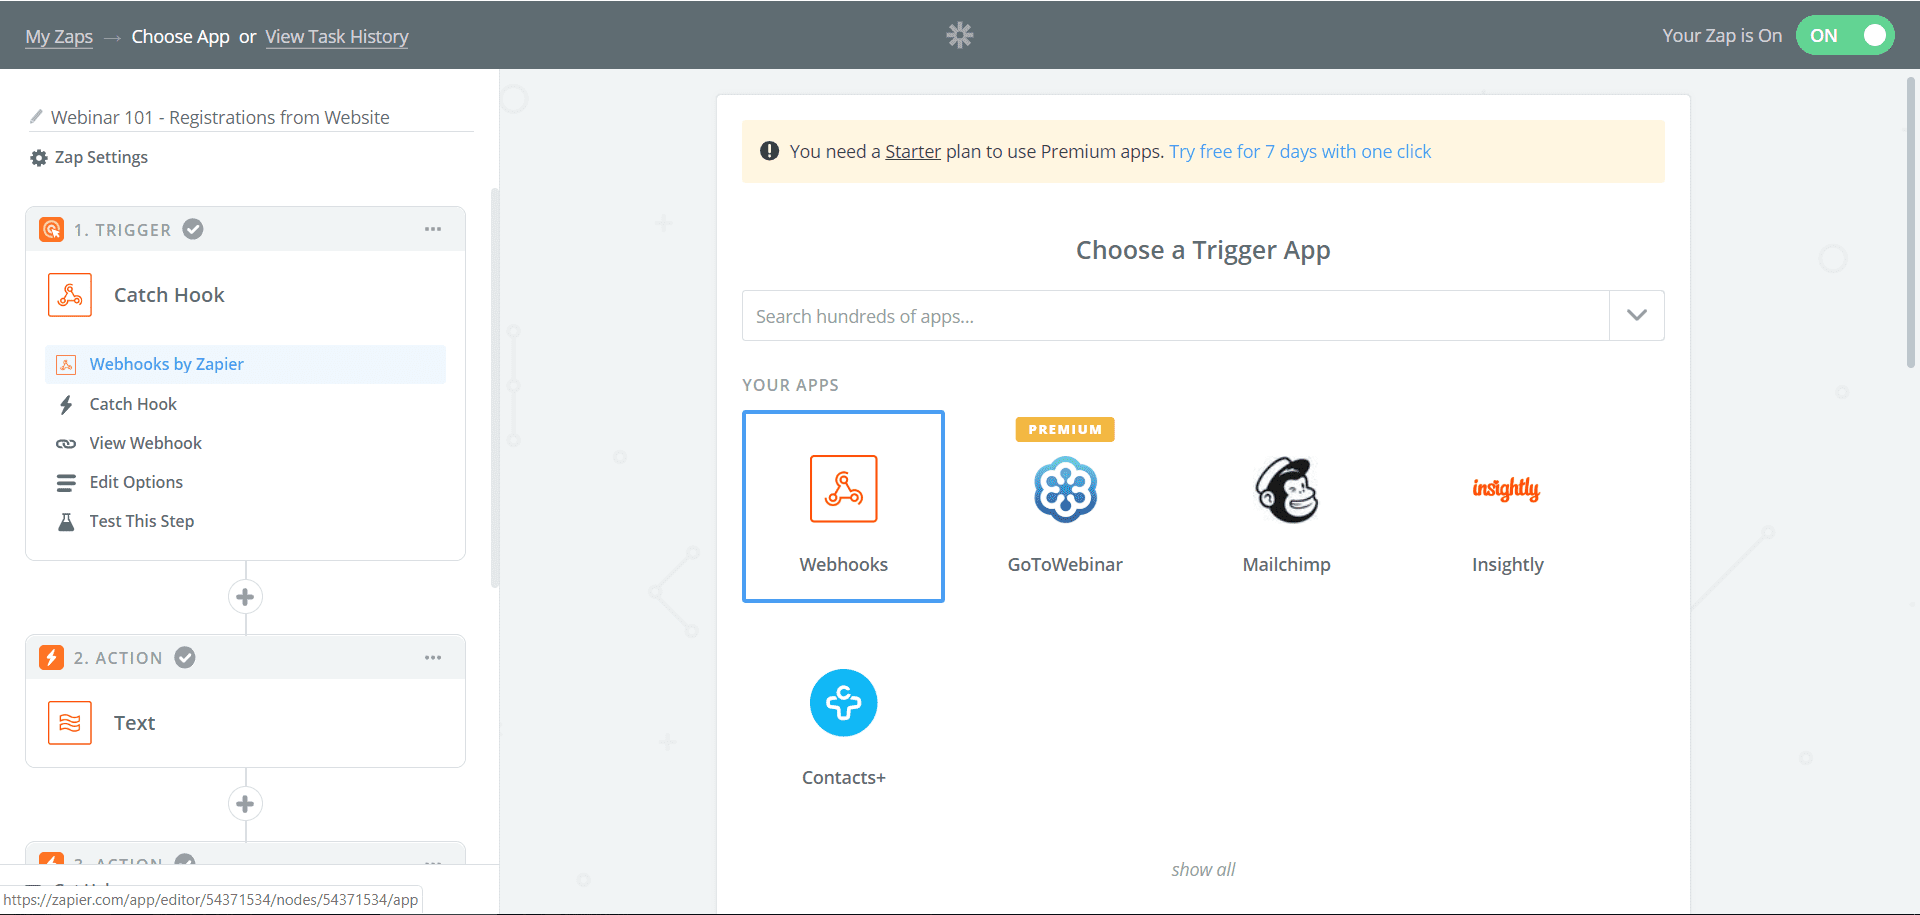
Zapier will display the hook which is simply a URL. When you set up the Elementor form and add the “Webhook” action to the form Elementor will prompt you to enter the URL you get from Zapier.
Now every time someone submits the registration form on your WordPress landing page Elementor will use the webhook to send the registration data to Zapier.
Now we need to tell Zapier what to do with the data.
In Zapier, select GoToWebinar (or whatever your webinar tool is) as the app for the action step. The action you’re looking for is “Create Registrant”.
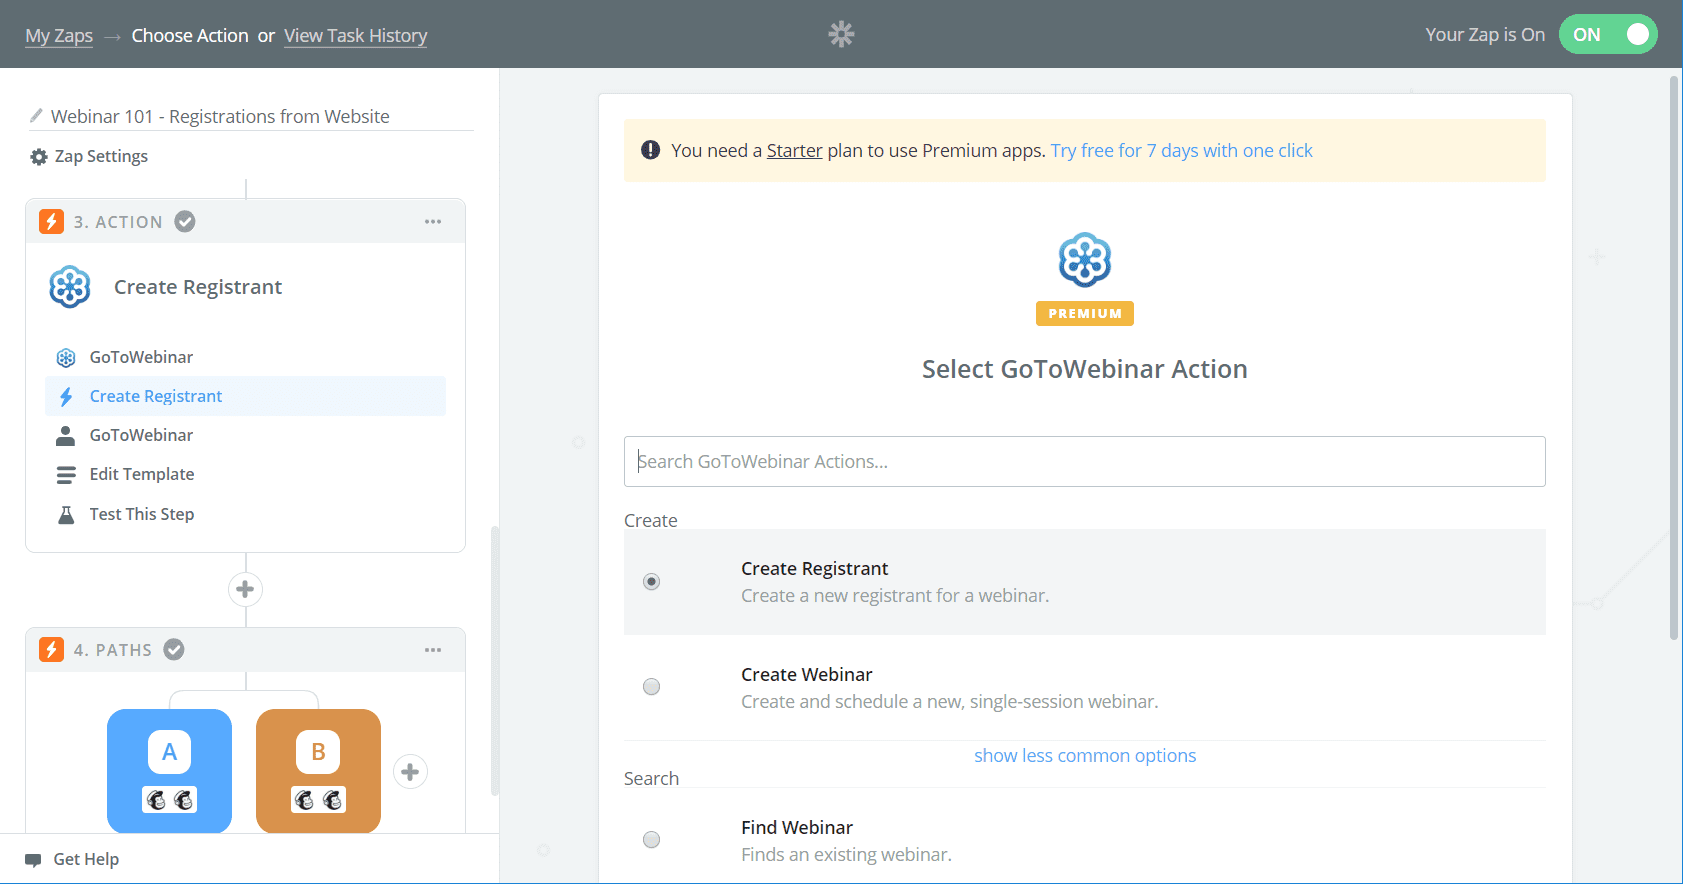
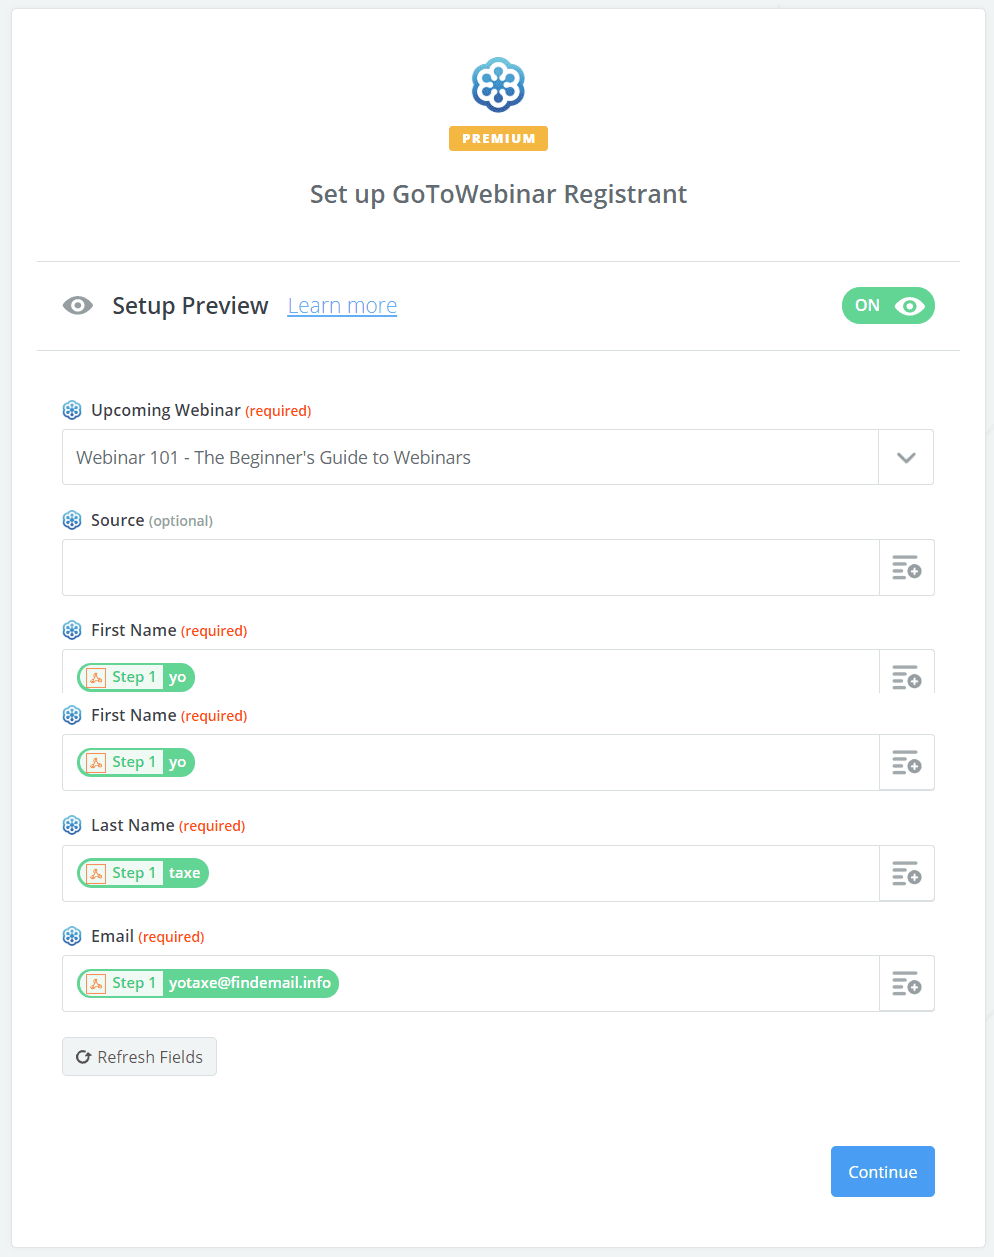
Now it’s time to edit the template for this step. What you’re doing here is to map the form fields from your Elementor form to the mandatory fields GoToWebinar requires.
You’ll need to:
- Select the upcoming webinar that you want to register the contact for. In my case that is the “Webinar 101” workshop.
- Map the first and last name from your Elementor form/webhook to the matching GoToWebinar fields
- Map the email address from your Elementor form/webhook to the matching
GoToWebinar (and pretty much any other dedicated webinar tool) comes with fully automated emails. That means you can send confirmation, reminder, and follow-up emails directly from GoToWebinar.
That’s super-convenient and a real time-saver, but you might find the standard templates somewhat limiting in terms of customizability and branding.
That’s where email marketing tools like MailChimp come in.
You could turn all GoToWebinar emails off and send every single email from MailChimp, but I actually recommend you keep one GoToWebinar email turned on: the confirmation email.
GoToWebinar’s confirmation email is lightning fast, has excellent deliverability and will often land directly in the inbox rather than get categorized as advertising.
It also contains automatic add-to-calendar links that are a bit of a hassle to replicate, at least in MailChimp.
So for this tutorial, we’ll keep the confirmation email from GoToWebinar and will send a second, more personal confirmation from MailChimp.
We’ll turn all other GoToWebinar emails off and send them from MailChimp.
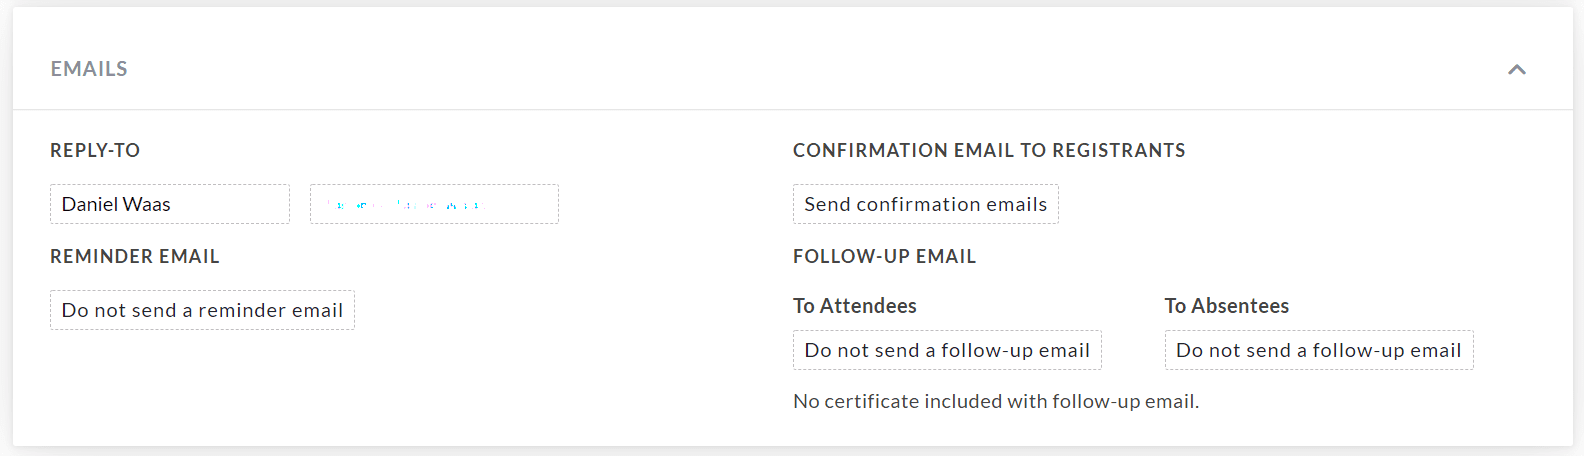
In GoToWebinar, navigate to your webinar and under “Email”, turn off the reminder and follow-up emails. Your settings should look like this:
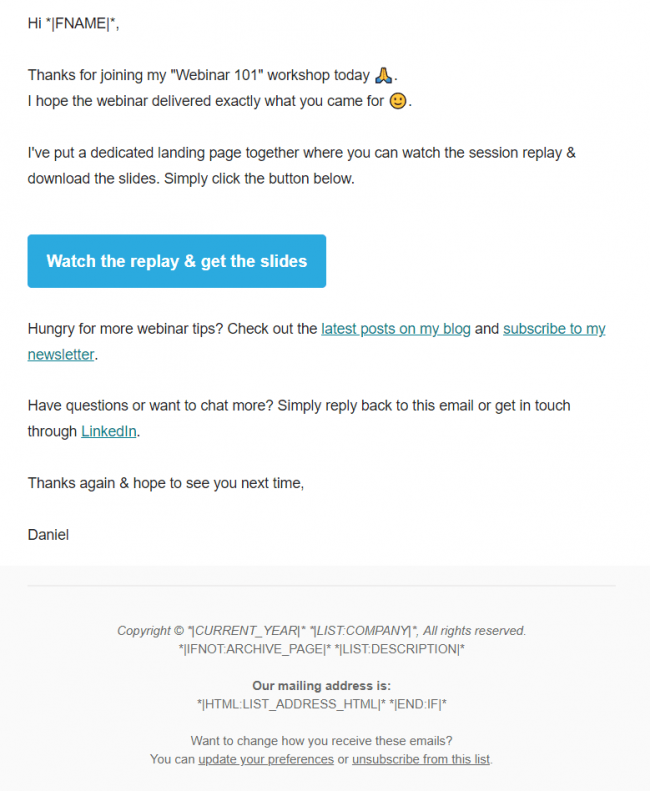
The two screenshots below show you the GoToWebinar confirmation email and the one we’ll set up in MailChimp side by side.
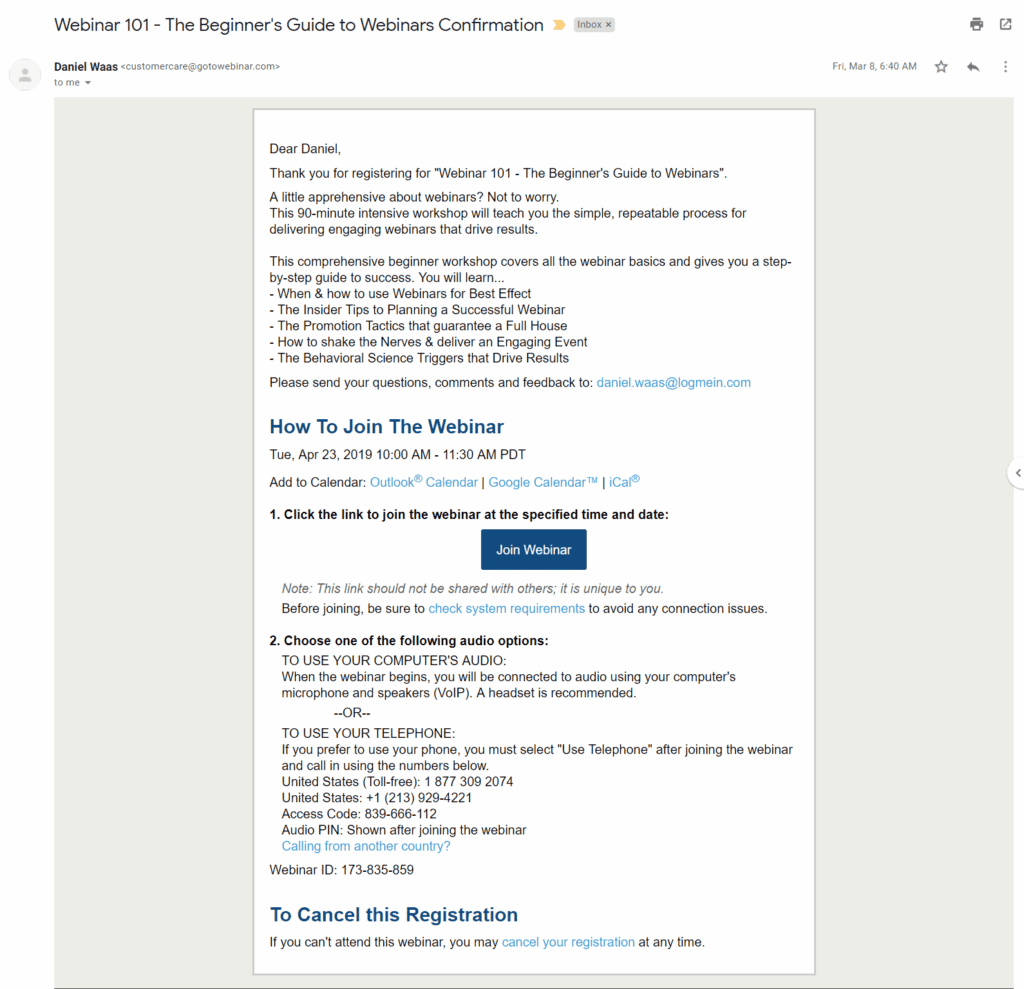
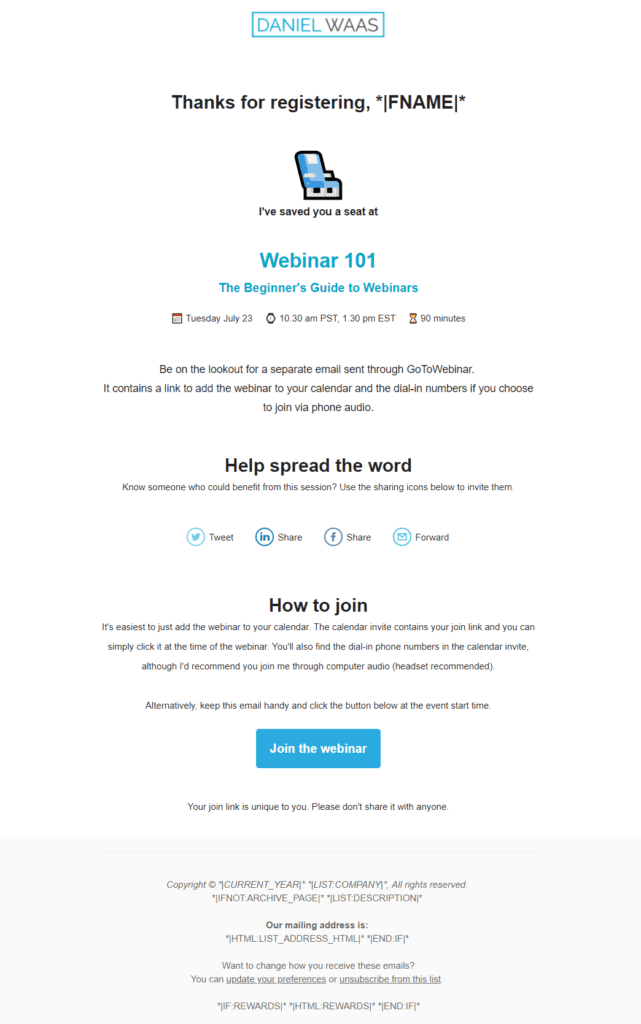
As you see the confirmation from MailChimp looks a lot less formal, has a neat little emoji, prompts registrants to spread the word, & has a big button to join once the time is right.
I’m no designer so the email isn’t the prettiest, but the options for customizing the design and content are relatively limitless. I’m sure you’ll come up with a true Mona Lisa 🙂
If you’re strapped for time and need a quick start, download my webinar email templates.
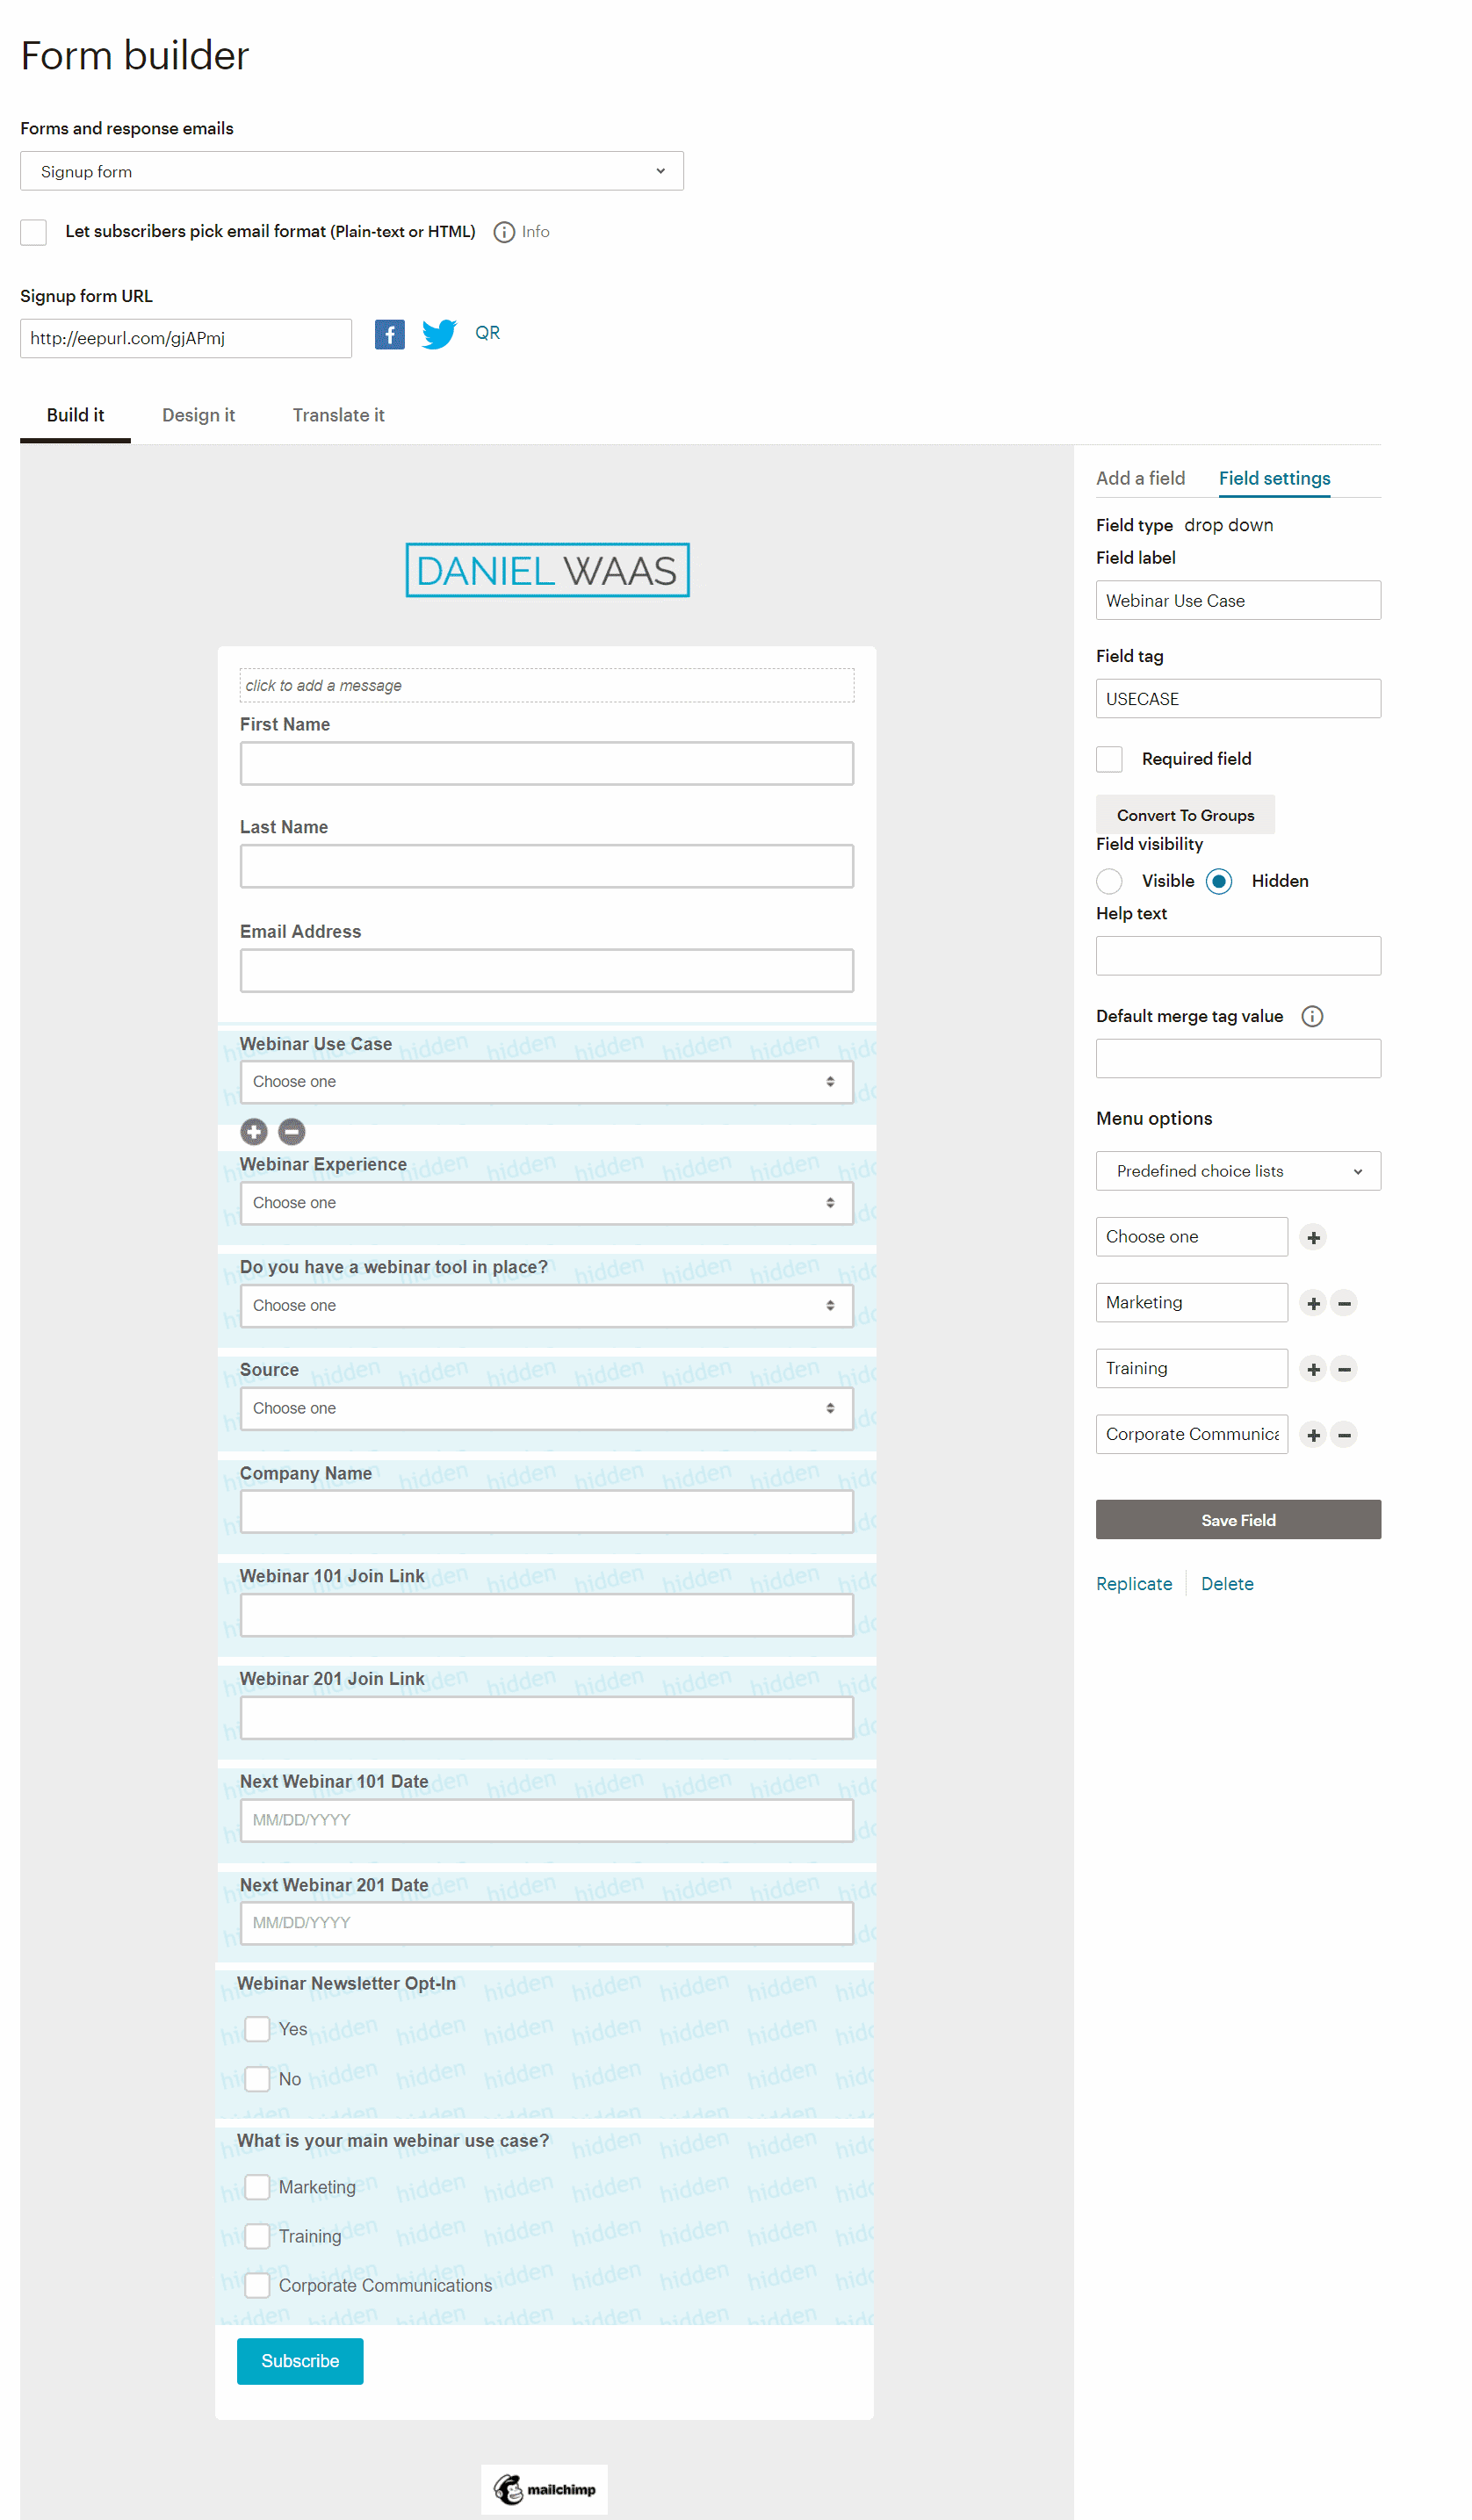
To make the magic work in MailChimp you’ll need a few custom fields. MailChimp is a little wonky in that you’ll rather unintuitively find the settings for that under “Form builder”.
The fields you absolutely need for this example are on for the date of the event and another to contain the unique join link of the registrant.
I’m nosy and want people to also sign up for my newsletter, so I have two more: a field to keep track of the contact’s opt-in status and another one capturing their main webinar use case. You’ll probably have different fields you want to keep track off.
The important bit is that you’ll need them created in MailChimp before you connect through Zapier.
Here’s what my MailChimp fields look like (sorry, bit of a mess ;-).
Notice that I’ve set them all to “hidden” as I don’t want them to show up on the single actual MailChimp sign-up form I use elsewhere on my website.
Back in Zapier, you’ll need two action steps in the zap you’ve started setting up.
For this to work you’ll need Zapier’s Starter plan at $20/month (btw. I’m in no way affiliated to Zapier). The Starter plan enables “multi-step zaps” which is exactly what we’re building here.
I’m pretty sure you can get by with the free plan if you sequentially string these actions together in separate zaps. Unfortunately, that will introduce a delay, so unless your budget is really tight I’d recommend you cough up the twenty bucks.
The two action steps you create are:
- Add/Update MailChimp Subscriber
In this step, you select your MailChimp mailing list and map the email field you got from your form submit (webhook) to the MailChimp email field.
Set “Update existing” to yes to ensure existing subscribers that sign up for the webinar also get the confirmation email.
Also make sure you map the join link and webinar date from GoToWebinar to the MailChimp form fields you created a moment ago.
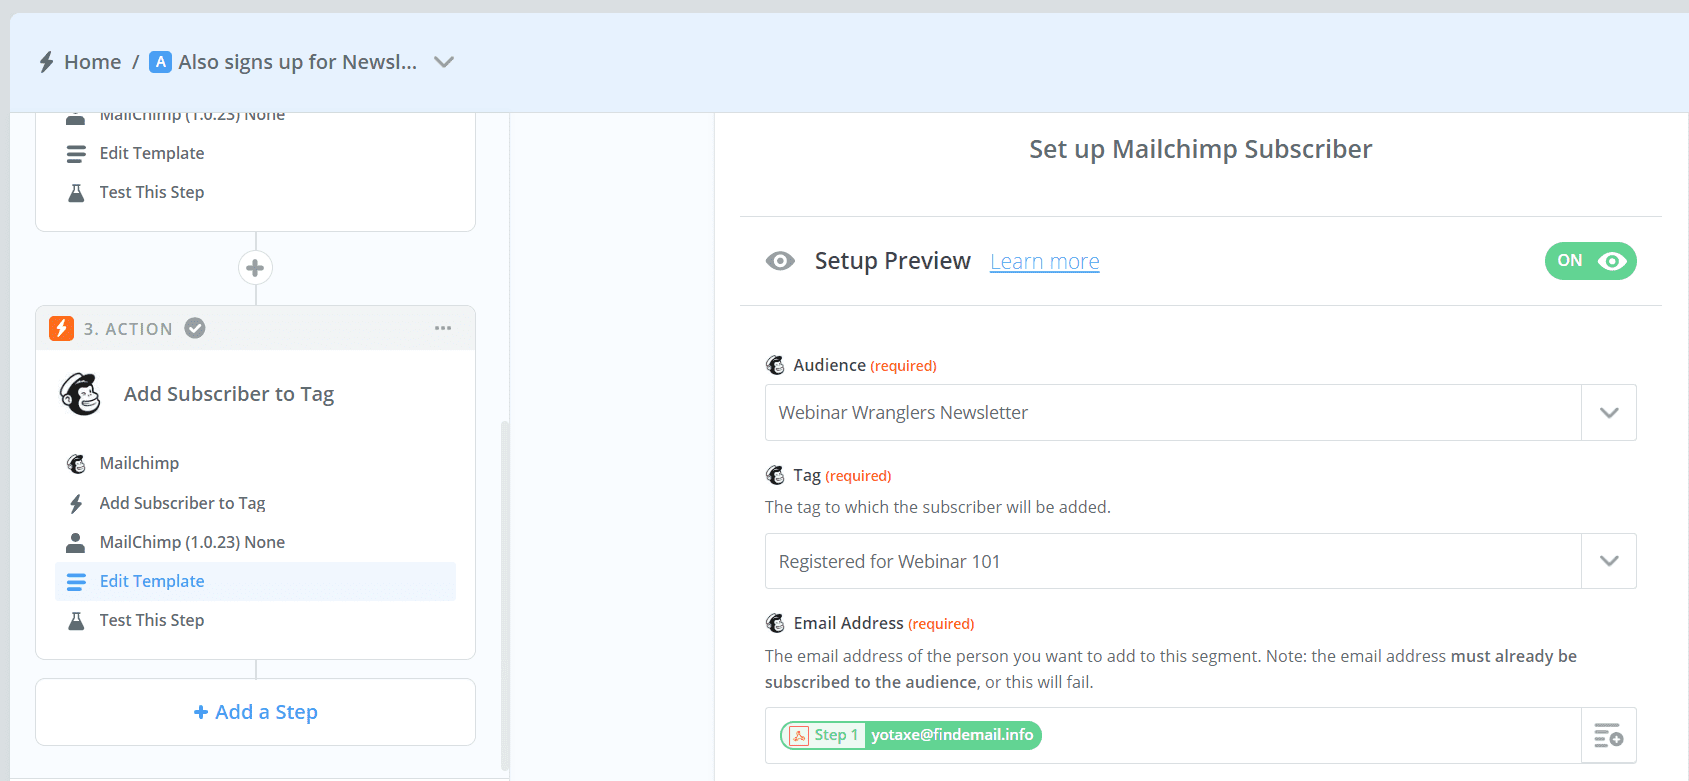
I’m additionally setting a couple of groups in MailChimp. This is optional for you. I’m using it to track opt-in status and the source of the registration. - Add Subscriber to Tag
In the second step, you set a tag for the subscriber. Tags are a neat MailChimp feature that you’ll be using to track the status of the subscriber. Consider it your friendly chimp’s memory.
In this step, we’ll set it to “Registered for webinar [webinar name]”. You’ll see why in a moment.
Here’s a quick look at what all of this looks like in Zapier.
The multi-step zap
(ignore the “Path” step – we’ll get to that later. It’s so that registrants that have also opted into the newsletter are treated differently).
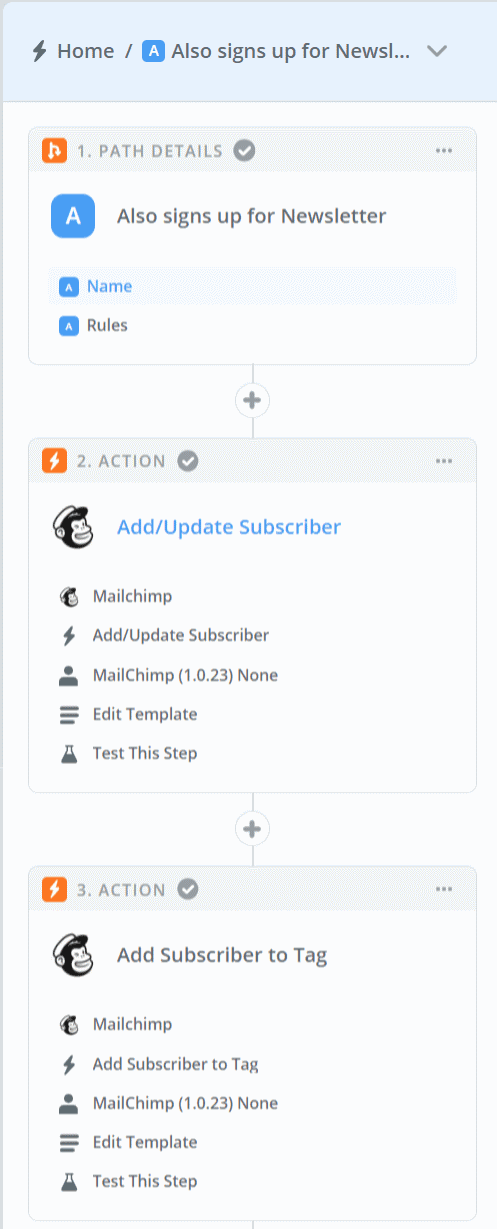
Creating the subscriber in MailChimp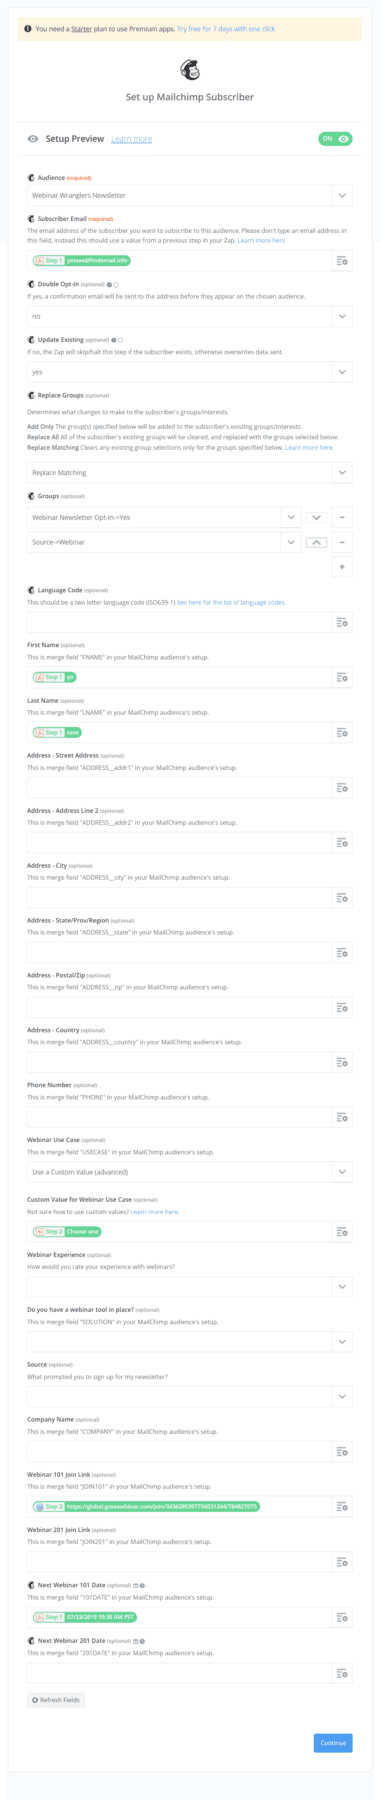
Adding a “Registered” tag
Getting a little tired? Thought you were done yet?
Not so fast, friend.
We still have to actually send the confirmation email. (Don’t you wish you’d just said “screw customization” and stuck with your vendor’s automated emails?).
It’s an “automation email” and its trigger is the tag we just set.
Let’s rewind for a moment:
- The user comes to your webinar landing page in WordPress
- The user submits the sign-up form
- Zapier collects the form data and registers the user with GoToWebinar
- GoToWebinar sends the confirmation email
- Zapier sends the form data to MailChimp and creates a new subscriber (or updates an existing one). Zapier adds the join link and date it gets from GoToWebinar to that subscriber as well.
- MailChimp sets a tag for that subscriber “Registered for webinar [webinar name]”
Ok, so MailChimp now has everything needed to send the confirmation email. Here are the rules I’ve set for that email in MailChimp:

Here’s what it all means:
- The confirmation triggers immediately after a contact is tagged with “Registered for…”
- I have the schedule set to “Every day, all day” so that the confirmation gets send regardless of when the user signs up
- I have a few conditions under which to send the email. The contact must be tagged with “Registered for” but cannot be tagged with “Confirmation sent…” or “Attended…”. This is to ensure I don’t accidentally send the confirmation to people that have already received it in the past.
- Once the email is sent I add a new tag for the subscriber “Confirmation sent for [webinar name]”. This tag will be the trigger for the reminder emails.
Remember where it said “Path” at the beginning of the multi-step zap? Let’s return to that for a moment.
In Zapier a path lets you set conditions that result in different actions.
In this case, I want to treat registrants differently if they also want my newsletter.
Webinars are a high-value piece of content and their nature as an event you register means they’re a solid tactic to build your email list.
An hour after they sign-up for the webinar I send them a welcome email that kicks off a 5-day onboarding drip campaign. Those that haven’t opted in receive only the webinar confirmation and reminder email.
Here’s what the welcome email to the newsletter looks like. Notice how I reference the webinar in the intro paragraph. That’s the only change I made compared to my regular newsletter welcome email.

Unfortunately, Paths is an advanced Zapier feature only available in the professional plans and up. Again, you can chain together multiple zaps to achieve a similar result without having to upgrade.
Since we’ve turned all of GoToWebinar’s automated reminder emails off we have to create and send them through MailChimp.
This one’s a little tricky as MailChimp’s automation features are somewhat limited. While MailChimp does have a date-based automation trigger that trigger can only be based on a date field stored on the contact record.
I had to use a bit of a hack to get this to work. I’ve added a date field for each of my webinars to MailChimp. It’s not very elegant, but it does get the job done.
What I’ve done is create a date-based automation email that pulls the date of the event from the contact record and sends a reminder email a week, a day, and an hour before the webinar.
This is what it looks like: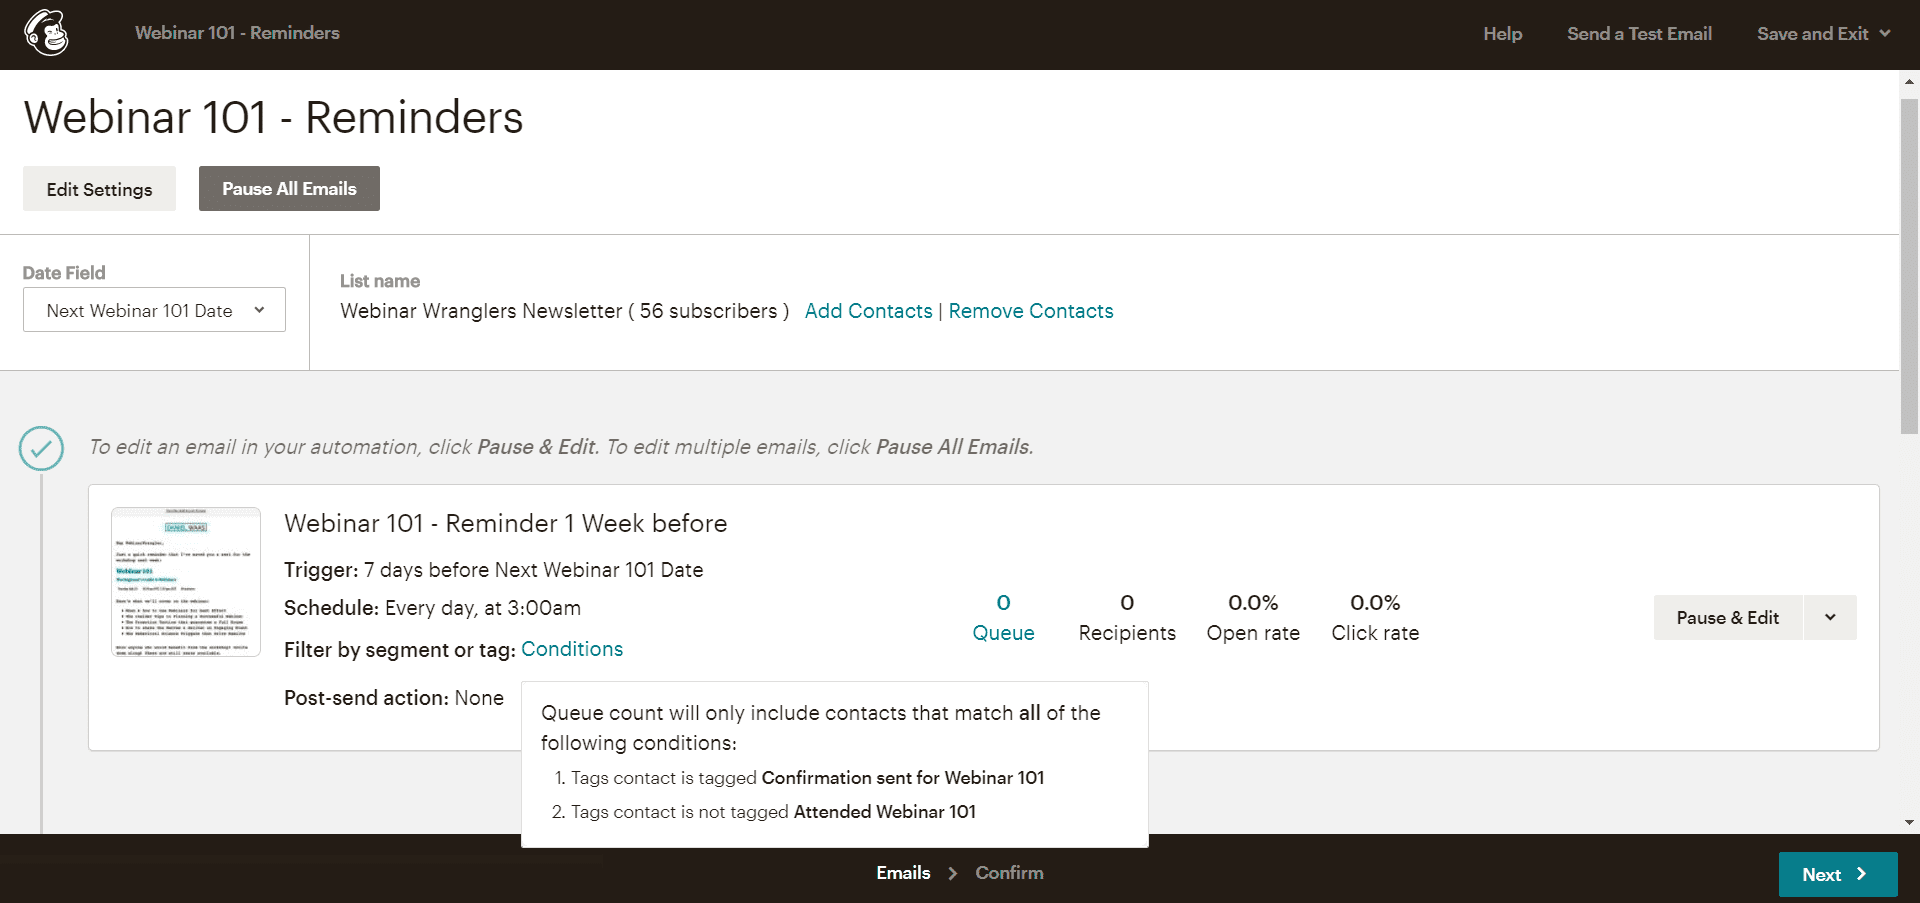
And here’s a look at one of the reminder emails:
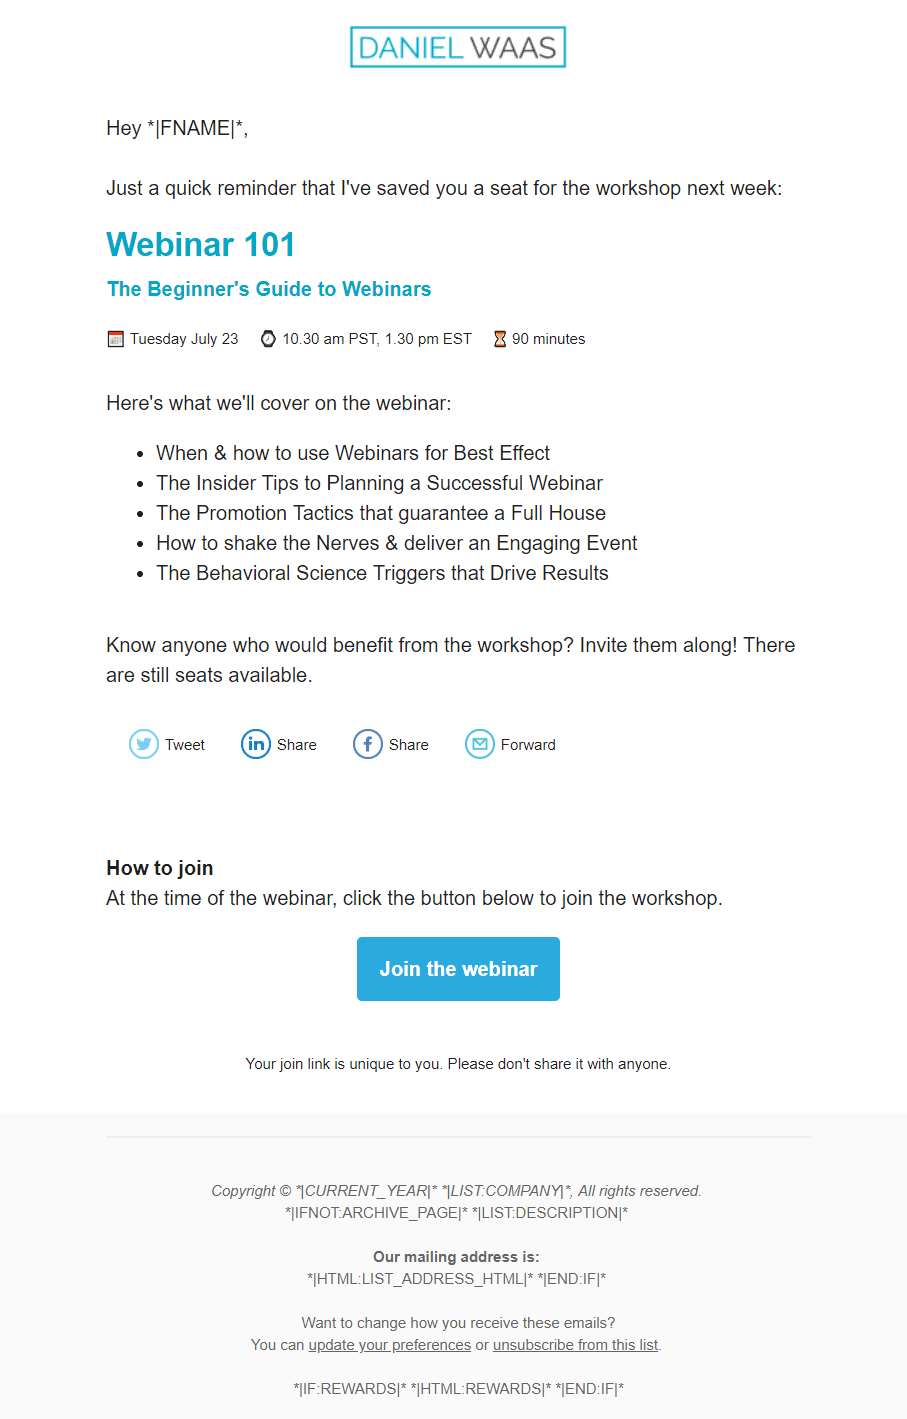
With your custom confirmation and reminders you’re all set for a webinar with great attendance.
All that’s left to do is to host the webinar. I won’t cover this here as I’ve already written down my best webinar advice over here.
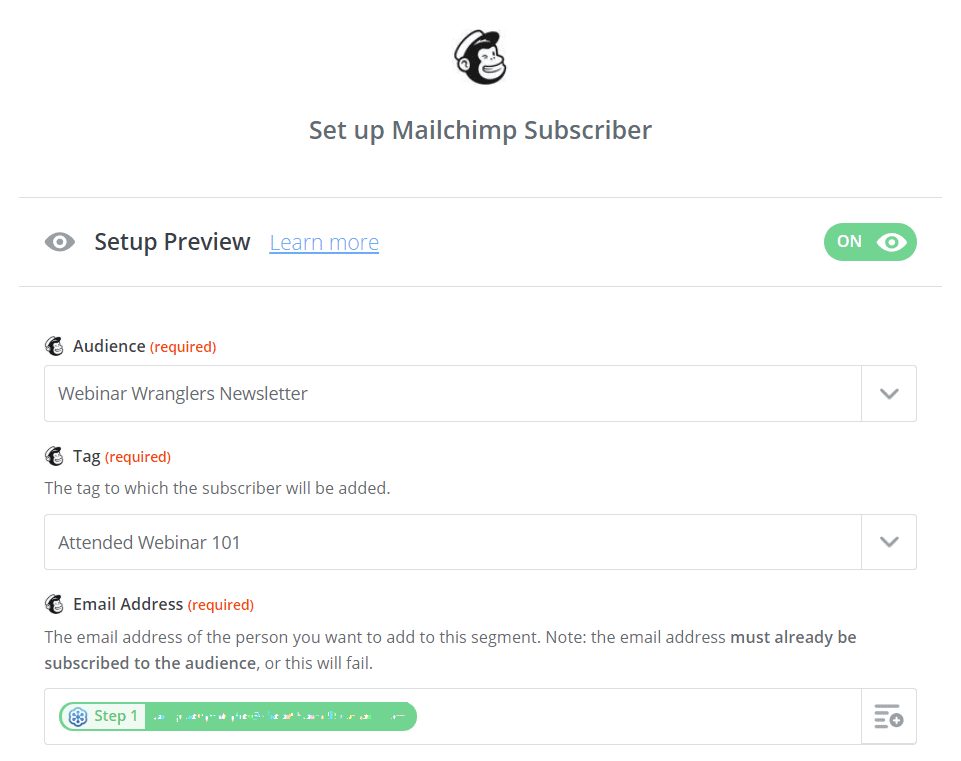
The moment the webinar ends GoToWebinar will set a status for each registrant of either “attended” or “did not attend”.
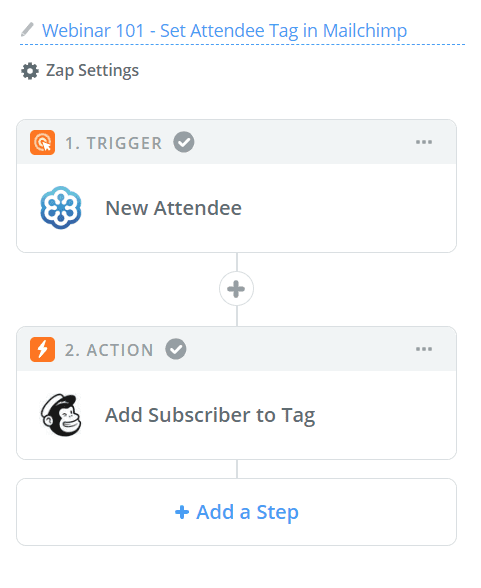
I have a separate zap set up that is triggered when that status is set and pushes the information to MailChimp where a tag “Attended Webinar 101” is set.
Here’s what the zap looks like:
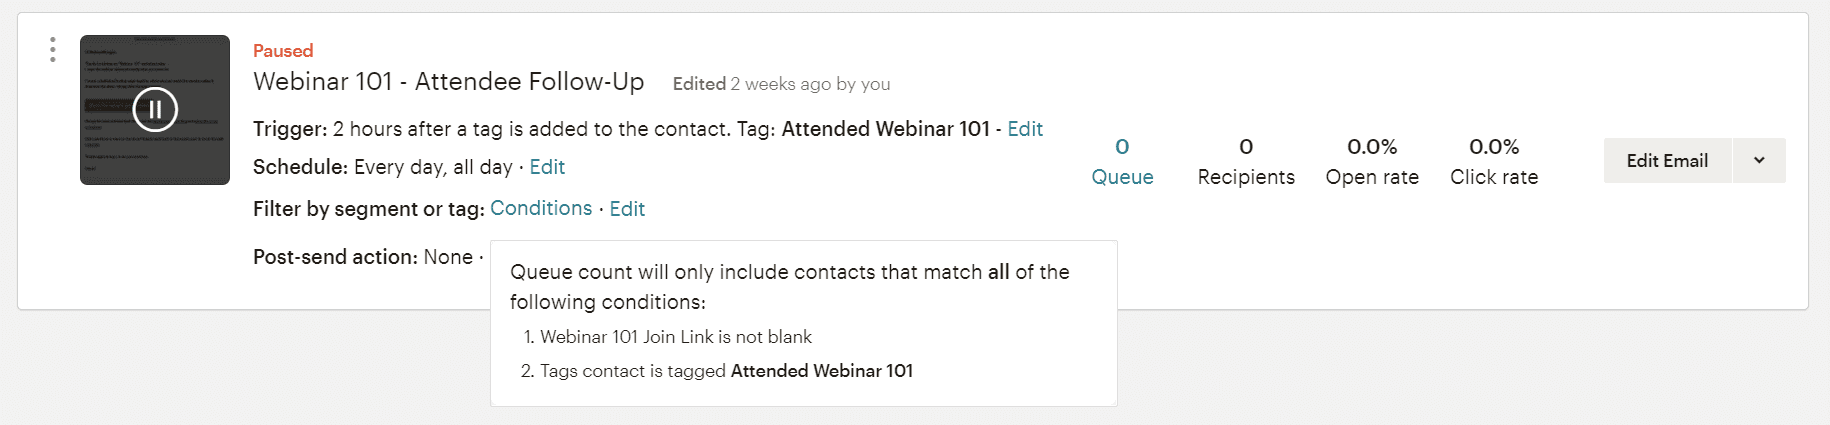
In MailChimp I have two emails set up that only differ slightly.
Each has a set of conditions for when they’re sent that are meant to ensure that the email reflects whether they attended or not and that I don’t accidentally send an email to previous participants of the same session (as I’m running this webinar every month).
Here are the conditions that trigger the attendee email:
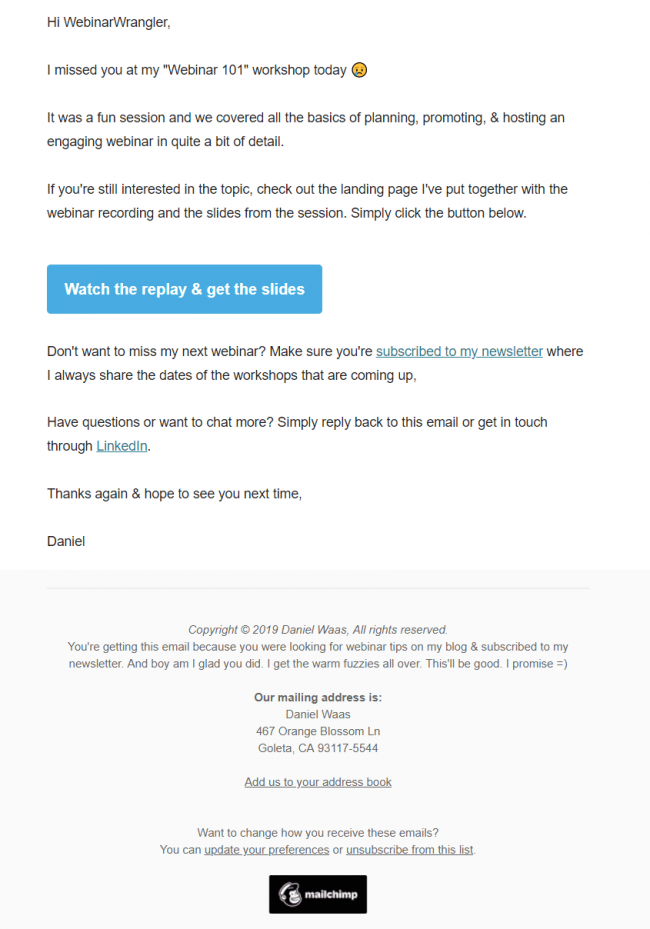
And the same for the email to no-shows:
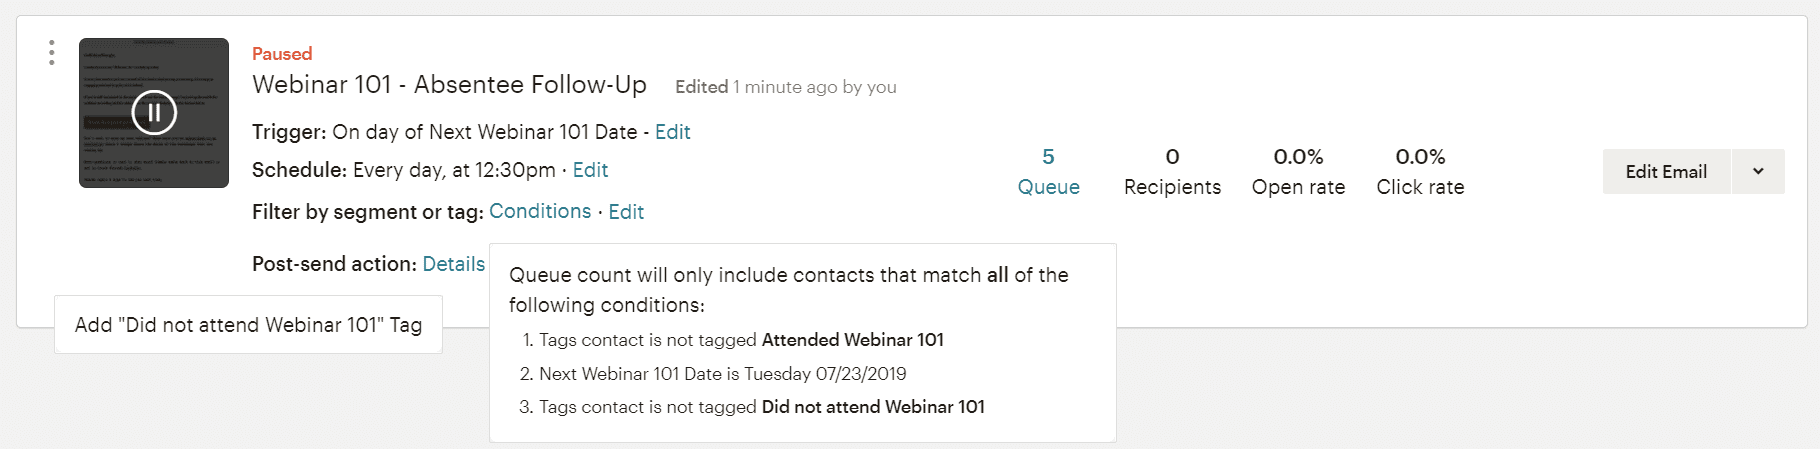
For the absentee email, I’m using a date-based automation that is set to run shortly after the webinar is over. If they already haven attended tag, this automation will not run.
To make sure I don’t send the absentee email multiple times I’m setting a “Did not attend Webinar 101” tag and check for that tag (in case it was set as part of a previous Webinar 101 session).
Here’s a side-by-side look at how (little) the two emails differ.
Your persistence has paid off. You’ve reached the last step of the process: the replay page.
The number one and two questions on almost every webinar I’ve ever hosted are:
- Are you recording this session?
- Can I get the slides?
And then there are the 26% of people that register for live webinars that say they only signed up to get the recording (data point based on a survey I ran among webinar attendees a few years back). They had no intention of ever showing up because they prefer to watch at their own pace on-demand.
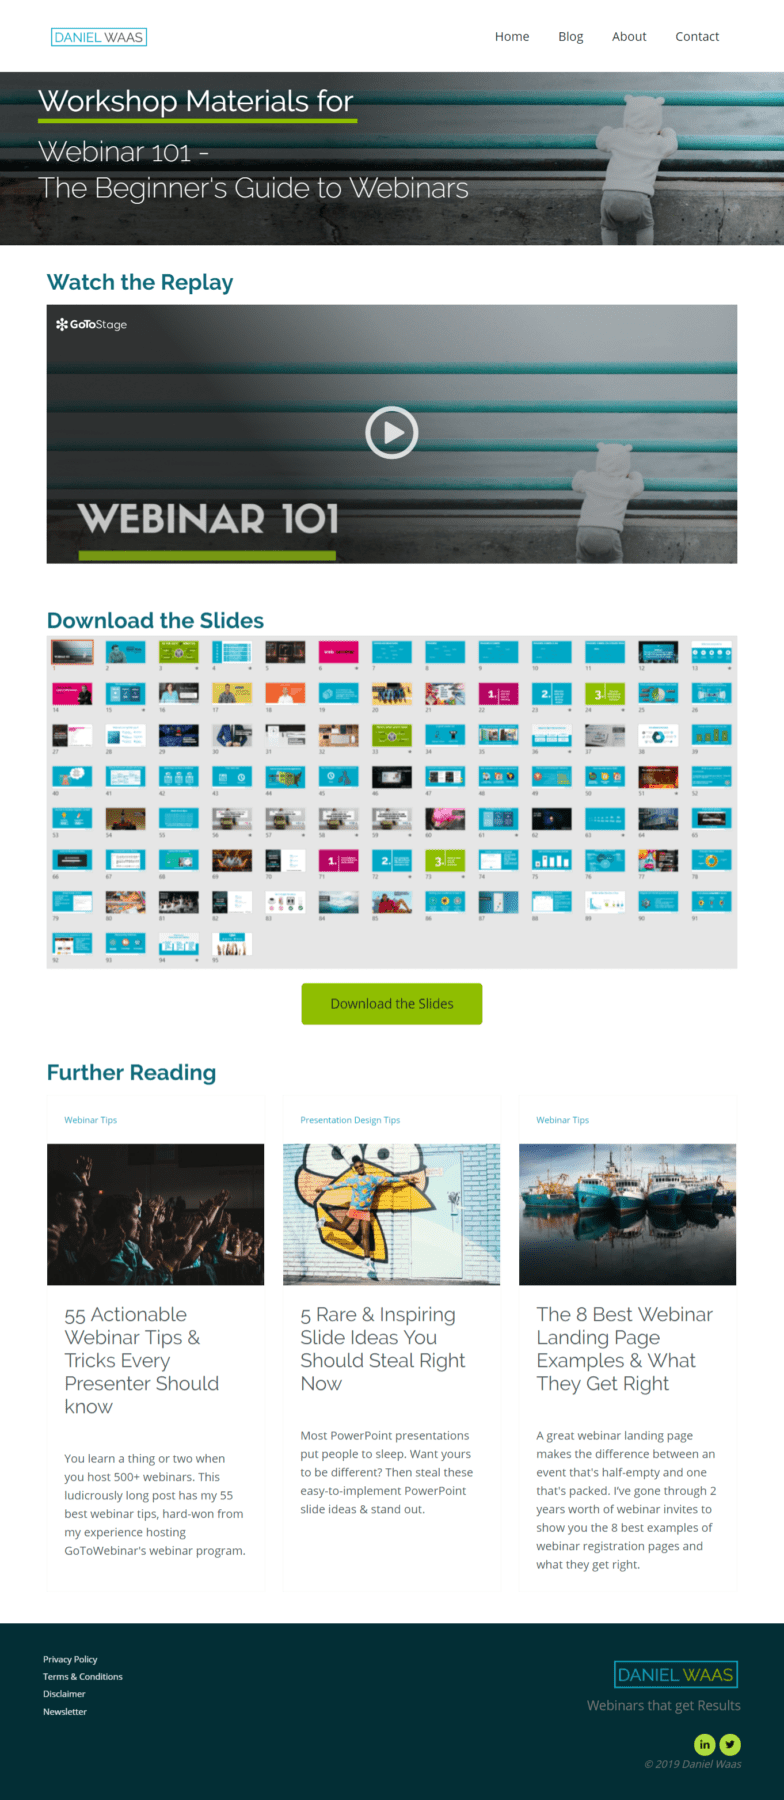
The replay page solves for both of these groups by offering all the relevant information on one page. I have three elements on the Webinar 101 replay page:
- The webinar recording hosted on LogMeIn’s public video platform GoToStage and embedded from there with an embed code. The benefit: When someone watches the replay the data automatically tracks back into my GoToWebinar account.
- The slides, hosted either on SlideShare or in your own CMS.
- Any other action you are looking to drive. In this case, I’m offering related content from the blog. I also plan to include a sign-up link for my Advanced Guide to Webinars session when I have a moment.
- Lastly, you can track the replay page in your web analytics tool to get a sense of how many leads you attract after the webinar is over. More on webinar analytics here.